Watch Configuration Help
The Watch Configuration page lets you choose what your T-Watch S3 does, then builds a custom firmware file (the program that runs on the watch) for you to download and put onto the device. The options that you can set include:
- What gesture is recognised by the watch.
- How sensitive the watch is to movement.
- Which receiver module the watch communicates with.
You don’t need any programming knowledge — just work through the page from top to bottom.
How it works: Each time you select an option or enter a value, this is written to a configuration file. When you create the firmware at the bottom of the page, this configuration file is read and used to create the firmware with. So, you can go back and change your selections as many times as you want. The configuration file is only read when you click on the ‘Generate firmware’ button at the bottom of the page.
If the option you’re setting has a ‘submit value’ button, then the value you select is not written to the configuration file until you click the submit button.
Using the T-Watch-S3 configuration website
Using this website you will configure and download a file for your watch which will be called e.g.
zeuss-twatch-s3-firmware.bin
You are free to rename the file after you download it.
The Greek god’s name at the start of the filename will probably be different from the example and will change each time that you restart the configuration page. See below for details of why this is done.
Step 1 — Check your session name
At the top of the page you’ll see your session name. This is a name of a Greek god.
Each time you re-open the configuration page, you will be assigned a new session name. This is done so that the firmware you build doesn’t get mixed up with anyone else’s. The names are taken randomly from a pool of Greek god names. When you next use the site you will probably get a different session name. This is done so that:
- If several people are using the site at the same time, everybody gets a different session name.
The firmware filename produced by the website contains the session name.
e.g. zeuss-twatch-s3-firmware.bin
This way, you get the software for your device and not for anybody elses device, even if several people are using the site at the same time. You’ll get the same names popping up if you use the site enough as there’re only so many Greek gods! The main reason for doing this is to enable several different users to access the site at the same time without interfering with each other. I could’ve used something other than Greek god names but it seemed as good a method as any.
I did add the functionality for you to assign your own session name but realised that this could be named with the name of whoever uses the system, which is a leak of personal information, so removed it.
You’re free to rename the firmware that you create after you’ve downloaded it to your own device. Renaming the file won’t change how it works, so long as you keep ‘.bin’ at the end of the filename. The ‘.bin’ ending is required so that the software that then takes your firmware and loads it onto the watch recognises the file as a firmware file.
If the session name is ‘undefined’ then there is a problem with the website! Try again in 10 minutes as this could mean that I’m uploading and testing a new version of the website and have cocked something up. I do test the website offline before loading up a new version but sometime things work offline but not on the Real World deployment site you’re using. Otherwise, let me know and I’ll get it fixed.
Step 2 — Choose a gesture
Under Gesture Selection, pick the movement the watch should respond to — a punch or a roll of the wrist. If you’re just starting out trying HandShake, choose the punch gesture. This one is the most generic gesture detection algorithm. Choose one, then click submit_gesture. The two gesture algorithms are described below. I intend to make some videos showing the two gestures and to put some links here.
Punch gesture
This is a simple algorithm that looks for a shake in any direction that exceeds the sensitivity value. The sensitivity for triggering the algorithm is set below.
Roll gesture
This gesture was written for a participant who had a slow wrist rolling gesture. The roll algorithm differentiates the acceleration data from a single accelerometer axis, triggering gesture detection when the differentiated value exceeds an adjustable threshold.
Step 3 — Set the gesture sensitivity
The Gesture Sensitivity slider controls how strong a movement has to be before the watch registers it. The value entered here is just a starting point as we can adjust the sensitivity later using the receiver:
The sensitivity can be adjusted using the jog wheel on the receiver unit and then sent to the watch using a long press on the button in the middle of this wheel.
The lower the value that is selected, the lower the amount of shake that is required to create a trigger. This means that the watch is more sensitive to faint shakes. This is as the number represents the value of acceleration that has to be exceeded for a trigger to be sent. If you don’t know what value to try, just start with the default and click submit_sensitivity.
Step 4 — Set the minimum shake interval (optional)
The Minimum Intershake Interval slider controls the minimum time (in milliseconds) that must pass between separate shake detections. This prevents the watch from registering the same shake as multiple separate events. Start with the default of 300 ms and click submit_shake_interval. If you find the watch is registering unintended multiple detections, increase this value. If you find it’s too slow to respond to rapid successive movements, decrease it.
Step 5 — Set an ESP-NOW target (optional)
This step is only needed if your watch has to send its signal wirelessly to another HandShake device. If that applies to you, click the ESP-NOW target MAC button to reveal the boxes, type in the six pairs of characters that make up the other device’s address, and click Submit MAC.
Step 6 — Generate the firmware
Each time you change one of the controls above, make sure you’ve clicked its submit button — this saves your choice in the background.
When you’re happy with all your selections, click Generate Firmware. The site reads your choices and builds the firmware file. This usually takes a minute or two, and you’ll see progress messages while it works, so please be patient.
Step 7 — Download the firmware
Once the build finishes, a download option appears. Click it to save the firmware file to your computer.
Once it’s downloaded, the firmware is yours forever! You own it. No time limits, no subscriptions. All yours.
Putting the firmware onto your watch
I wrote a tool to allow you to upload your firmware to the T-Watch S3 through a USB cable. Please go to the firmware uploading page use this firmware upload site:
If for any reason, my uploader does not work for you, there are alternatives!
Here’s a site written by somebody else that will also upload firmware to your T-Watch S3:
- Plug the watch into your computer with a USB data cable.
- Click Connect on the top toolbar, then choose the port the watch is connected to.
- Select Flash Tools from the menu on the left.
- Leave all the default settings as they are — in particular, the Start offset is
already correct at
0x0, so there’s no need to change it. - Click the icon next to the Firmware binary (.bin) box and choose the firmware file you saved.
- Click Flash Firmware just below it.
The new firmware will be written to the watch. You may need to disconnect the watch and restart it for the new firmware to run, though sometimes it starts on its own.
I turned off the touch interface on the watch to prevent accidental touches changing things.
Don’t panic if something goes wrong. If you accidentally flash the wrong firmware to the watch, just reconnect the watch with the USB cable to your PC and flash the correct file.
Resetting the watch if it becomes unresponsive
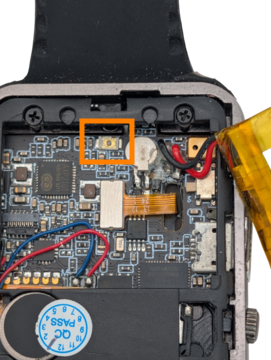
It is possible to write code that stops the watch from programming! In this case we need to turn the watch off, then turn it on while pressing a small reset button inside of the watch. I had to do this a few times when developing the firmware for the watch. Once the watch has restarted with the button held down, it will program again.
To access this button, you need to take the back off the watch and remove the battery in the same way that you did when first using the watch to turn on the switch that connects the battery to the watch. Note the position of the reset button shown by the orange box. I use the end of a pencil to push this down. It’s small and fiddly!